Are you experiencing a wobbly or unresponsive hoverboard? It’s likely time to calibrate your self-balancing scooter. Calibration is a crucial step in maintaining your hoverboard’s performance and ensuring a smooth ride. In this comprehensive guide, we’ll provide you with a step-by-step process to calibrate your hoverboard, troubleshoot common issues, and keep your ride in top shape. Whether you’re a seasoned rider or new to the hoverboard world, this article is packed with valuable insights that you won’t want to miss.
Table of Contents
Why Does Your Hoverboard Need Calibration?
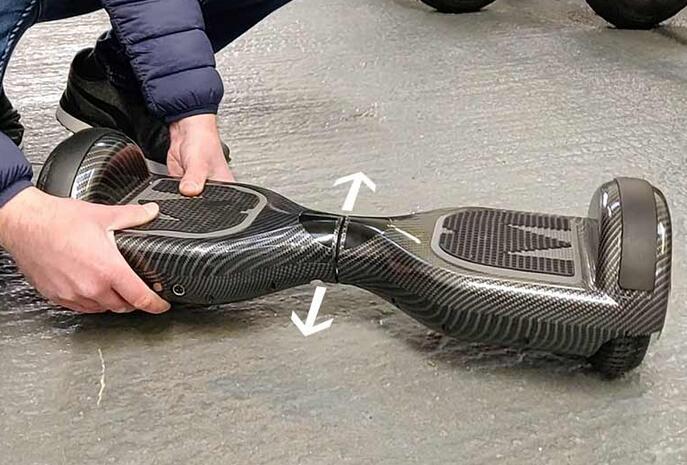
Calibration is necessary to ensure that your hoverboard’s internal sensors are properly calibrated. The gyroscope and tilt sensors work together to keep your hoverboard balanced and responsive to your movements. Over time, these sensors can become misaligned, leading to a wobbly and unsteady ride. Regular calibration helps realign these sensors, ensuring optimal performance.
Hoverboards rely on a combination of sensors to detect changes in orientation and balance. The gyroscope measures the rotation of the hoverboard, while the tilt sensors detect changes in tilt and movement. When these sensors are not properly calibrated, it can lead to issues such as a wobbly ride, unresponsiveness, or even sudden jerks.
The Role of the Gyroscope in Hoverboard Calibration
The gyroscope is a vital component of your hoverboard’s internal sensors. It measures the rotation of the hoverboard and provides crucial data for maintaining balance.
During calibration, the gyroscope’s readings are reset, allowing it to accurately detect orientation changes and maintain balance. A properly calibrated gyroscope ensures that your hoverboard responds correctly to your movements, providing a smooth and stable ride.
The gyroscope works in conjunction with the tilt sensors to detect changes in tilt and movement. Together, these sensors provide real-time data on the hoverboard’s position and orientation. When the gyroscope is properly calibrated, it helps the hoverboard maintain its balance and stability.
The Signs Your Hoverboard Needs a Reset
Knowing when to calibrate your hoverboard is key to maintaining its performance. Here are some common signs that indicate your hoverboard may need a reset:
- Wobbling or unsteady ride: If your hoverboard feels unstable and wobbles from side to side, it’s a clear sign that calibration is needed. This can make riding your hoverboard both uncomfortable and potentially dangerous.
- Drifting to one side: If your hoverboard consistently drifts to one side even when you’re not applying any pressure, it’s likely due to sensor misalignment. Calibration can help realign the sensors and restore proper balance.
- Unresponsive to movements: If your hoverboard doesn’t respond as expected to your movements or feels sluggish, calibration can help restore its responsiveness. This can make your ride smoother and more enjoyable.
How to Calibrate a Hoverboard in 6 Easy Steps
Calibrating your hoverboard is essential for maintaining optimal performance and ensuring a smooth and safe ride. Follow these six easy steps to calibrate your hoverboard:
- Find a flat and level surface: Begin by locating a flat and level surface to perform the calibration. This could be in your home, garage, or any other suitable area.
- Turn on the hoverboard: Press the power button to turn on the hoverboard. Wait for the self-balancing scooter to initialize and stabilize.
- Step onto the hoverboard: Carefully step onto the footpads, placing one foot on each side of the hoverboard. Make sure your weight is evenly distributed.
- Activate the calibration mode: To initiate the calibration mode, press and hold the power button for approximately 5-10 seconds. You may hear a beep or see flashing lights to indicate that the calibration mode is enabled. Release the power button once the calibration mode is activated.
- Remain stationary: While in calibration mode, keep your feet planted firmly on the footpads and stand as still as possible. Avoid unnecessary movements that could interfere with the calibration process.
- Exit calibration mode: After a few seconds, the hoverboard will automatically exit the calibration mode and save the new calibration settings. You may hear a beep or see the lights stabilize, indicating that the calibration is complete.
Once the calibration process is complete, it’s essential to test the hoverboard to ensure that it’s properly calibrated. Take a short ride on a flat surface and check if the hoverboard feels stable, balanced, and responsive. If you still experience any issues or instability, you may need to repeat the calibration process or seek professional assistance from the hoverboard manufacturer or a certified technician.
Remember that calibration processes may vary slightly depending on the brand and model of your hoverboard. Always refer to the manufacturer’s instructions and guidelines provided in the user manual for accurate calibration instructions specific to your hoverboard.
How to Reset a Bluetooth Hoverboard with a Smartphone App
Resetting a Bluetooth-enabled hoverboard using a smartphone app is a convenient and straightforward process. Follow these steps to reset your Bluetooth hoverboard with a smartphone app:
- Install the manufacturer’s official smartphone app: Begin by downloading and installing the manufacturer’s official smartphone app for your Bluetooth-enabled hoverboard. You can usually find the app in the App Store (for iOS) or Google Play Store (for Android).
- Pair your smartphone with the hoverboard: Open the Bluetooth settings on your smartphone and turn on Bluetooth. Select your hoverboard from the list of available devices to establish a connection between your smartphone and the hoverboard.
- Open the hoverboard app: Launch the smartphone app and ensure that your hoverboard is turned on and within range. The app should automatically detect your hoverboard and establish a connection.
- Navigate to the reset option: Within the app, look for the reset or factory reset option. The location of this option may vary depending on the app and the hoverboard model.
- Follow the on-screen instructions: Once you’ve located the reset option, carefully read any instructions provided on the screen. The app will guide you through the reset process step by step.
- Confirm the reset: Confirm your intention to reset the hoverboard when prompted by the app. This step is crucial, as resetting the hoverboard will erase any personalized settings and return it to its default state.
- Wait for the reset to complete: The app will initiate the reset process and automatically perform the necessary actions to reset your Bluetooth hoverboard. This may take a few moments, so be patient and avoid interrupting the process.
- Test the hoverboard after the reset: Once the reset is complete, turn off the hoverboard and then turn it back on. Take a short ride to ensure that the reset has resolved any issues you were experiencing. If the issues persist, you may need to consult the manufacturer’s support or seek professional assistance.
Remember that the reset process may vary slightly depending on the specific app and hoverboard model you have. Always refer to the instructions provided by the manufacturer for the most accurate and up-to-date information.
How to Reset a Hoverboard from Any Brand (without Bluetooth)
If your hoverboard doesn’t have Bluetooth capabilities, don’t worry! You can still reset it using a simple manual process. Here’s how to reset a hoverboard from any brand without Bluetooth:
- Turn off the hoverboard: Start by switching off the hoverboard completely. Locate the power button, typically found on the side or top of the hoverboard, and press it until the device powers down.
- Disconnect the battery: In order to perform a reset, you’ll need to disconnect the battery. Locate the battery compartment cover on the bottom of the hoverboard and remove it. Carefully unplug the battery connector from the mainboard.
- Wait for a few minutes: Allow a few minutes for the hoverboard’s components to discharge completely. This step ensures that any residual power is drained from the system, effectively resetting the device.
- Reconnect the battery: After the waiting period, reconnect the battery by plugging the connector back into the mainboard. Make sure the connection is secure.
- Replace the battery compartment cover: Once the battery is reconnected, put the battery compartment cover back in place and secure it.
- Power on the hoverboard: Press the power button to turn on the hoverboard. You should see the LED lights illuminate, indicating that the reset was successful.
- Test the hoverboard after the reset: Take a short ride to ensure that the reset has resolved any issues you were experiencing. If the problems persist, you may need to consult the manufacturer’s support or seek professional assistance.
Remember to follow the manufacturer’s guidelines and any specific instructions provided in your hoverboard’s user manual when performing a reset. If you’re unsure about any steps, it’s always best to consult the manufacturer or a professional technician to avoid any potential damage to your hoverboard.
Troubleshooting: When Calibration Doesn’t Solve the Problem
In some cases, calibration may not completely resolve the issues you’re experiencing with your hoverboard. If you’ve followed the calibration steps but still notice problems, consider the following troubleshooting steps:
- Check for firmware updates: Some hoverboards can benefit from firmware updates that improve performance and address known issues. Check the manufacturer’s website or contact their support for any available updates.
- Inspect the footpads: Ensure that the footpads are clean and free from any debris or obstructions. Any dirt or objects stuck to the footpads can affect sensor readings and lead to calibration issues.
- Inspect the wheels: Examine the wheels for any damage or wear. If the wheels are misaligned, it can affect the hoverboard’s stability and responsiveness. Adjust or replace the wheels as necessary.
- Check the battery level: Low battery voltage can impact the performance of your hoverboard. Make sure the battery is fully charged before riding and see if the calibration issue persists.
If none of these troubleshooting steps resolve the problem, it’s recommended to seek professional assistance from a reputable hoverboard repair service. They can diagnose and fix any underlying issues that may be affecting the performance of your hoverboard.
User Manual Tips: Following Manufacturer’s Guidance
Every hoverboard model may have slight differences in the calibration process. It’s essential to consult the user manual specific to your hoverboard model for accurate instructions. The user manual provides detailed guidance from the manufacturer, ensuring that you follow the correct steps for your particular hoverboard.
The user manual typically includes step-by-step instructions, illustrations, and troubleshooting tips. It’s important to read and understand the manual before attempting to calibrate your hoverboard. Following the manufacturer’s guidance will help ensure a successful calibration process and prevent any damage to your hoverboard.
Hoverboard Repair: When to Seek Professional Help
If you’ve followed the calibration steps and troubleshooting suggestions without success, it may be time to seek professional hoverboard repair. While calibration can resolve many issues, there may be underlying problems that require expert attention. Professional repair services have the expertise and tools to diagnose and fix complex issues that may be beyond the scope of DIY calibration.
When considering hoverboard repair, it’s important to choose a reputable service center that specializes in hoverboards. Look for certified technicians who have experience working with your specific hoverboard brand and model. They can provide a thorough inspection, identify any underlying issues, and offer the necessary repairs to restore your hoverboard’s performance.
Maintaining Your Hoverboard After Calibration
Regular maintenance is essential to keep your hoverboard in top shape even after calibration. Here are a few tips to help you maintain your hoverboard’s performance:
- Store on a level surface: When not in use, store your hoverboard on a flat and level surface. This prevents any unnecessary stress on the internal components and helps maintain proper calibration.
- Avoid extreme temperatures: Exposure to extreme heat or cold can affect the battery and other internal components. Store your hoverboard in a cool and dry environment, away from direct sunlight or extreme cold.
- Clean regularly: Wipe down your hoverboard regularly with a soft, damp cloth to remove any dirt or debris. Avoid using harsh cleaning agents that can damage the surface or sensors.
- Inspect before riding: Before each ride, visually inspect your hoverboard for any signs of damage or wear. Check the wheels, footpads, and other components for any issues that may affect performance or safety. Replace any worn-out parts promptly.
By following these maintenance practices, you can prolong the lifespan of your hoverboard and ensure that it continues to provide a smooth and enjoyable ride.
FAQs About Hoverboard Calibration
Here are answers to some frequently asked questions about hoverboard calibration:
1. How often should I calibrate my hoverboard?
It depends on usage, but a general guideline is to calibrate every six months or whenever you notice performance issues.
2. Can I ride my hoverboard immediately after calibration?
Yes, once the hoverboard has restarted post-calibration, it’s ready for use.
3. Is it safe to calibrate a hoverboard at home?
As long as you follow the manufacturer’s instructions and use a level surface, it is safe to calibrate at home.
In Summary
Calibrating your hoverboard is a crucial step in maintaining its performance and ensuring a smooth and stable ride. By following the steps outlined in this comprehensive guide, you can confidently calibrate your hoverboard at home and troubleshoot any issues that may arise.
Regular maintenance and adherence to manufacturer guidelines will help keep your hoverboard in optimal condition for years of enjoyable riding. Remember to consult professional repair services when needed, and always prioritize safety and proper maintenance for the best hoverboarding experience.
For more information on hoverboard maintenance and troubleshooting, please visit Hoverboard Safety Standards and the Consumer Product Safety Commission.

