Hoverboards have become a popular mode of transportation for both kids and adults. However, like any electronic device, they can sometimes encounter issues that require a reset. In this comprehensive guide, we will walk you through the step-by-step process of resetting a hoverboard and provide you with all the information you need to know to fix common problems and calibrate your hoverboard for optimal performance.
Table of Contents
What is a Hoverboard Reset?
Before we dive into the reset process, let’s first understand what a hoverboard reset entails. A reset involves powering off the hoverboard and performing a series of steps to recalibrate its internal sensors and components. This process can resolve issues such as unresponsive controls, flashing lights, wheel imbalance, or other malfunctions.
Resetting your hoverboard should be your go-to troubleshooting step when you encounter any of these problems. It’s a relatively simple procedure that can often fix common issues without the need for professional repair.
Pre-Reset Steps
Before attempting to reset your hoverboard, there are a few important steps you should take to ensure safety and efficiency:
- Safety first: Turn off the hoverboard by locating the power button, usually located on the side or bottom of the device.
- Prepare your workspace: Find a flat and stable surface to work on, preferably indoors. This will provide a safe environment for troubleshooting and prevent any accidents.
- Tools you might need: Depending on your hoverboard model, you may need a screwdriver or other tools to access certain components during the reset process. Check your hoverboard’s user manual or online resources for specific instructions.
Now that you’re ready, let’s proceed with the step-by-step hoverboard reset process.
How to Reset or Calibrate a Hoverboard Step by Step?
Step 1: Locate the Power Button
The first step in resetting your hoverboard is to locate the power button. This button is usually located on the side or bottom of the hoverboard. It may be labeled as the “power” button or have a power symbol. Refer to your hoverboard’s user manual for the exact location if you’re unsure.
Step 2: Power Down Your Hoverboard
Once you have located the power button, make sure your hoverboard is turned off. Press and hold the power button for a few seconds until the device powers down completely. It’s essential to ensure the hoverboard is powered off before proceeding with the reset process.
Step 3: Manual Reset Technique
Now that your hoverboard is powered off, it’s time to perform a manual reset. The manual reset technique may vary depending on your hoverboard model. Here’s a general step-by-step process:
- Press and hold the power button: While the hoverboard is turned off, press and hold the power button again. Keep holding it for about 10 seconds.
- Release the power button: After holding the power button for the specified time, release it. You may hear a beep or see the hoverboard’s lights flash briefly.
Step 4: Calibrating the Hoverboard
Once you have completed the manual reset, it’s time to calibrate your hoverboard. Calibration ensures that the internal sensors and components are properly aligned and functioning. Follow these steps to calibrate your hoverboard:
- Place the hoverboard on a flat surface: Find a level surface and make sure the hoverboard is sitting level with the ground. This step is crucial for accurate calibration.
- Press and hold the power button: Turn on the hoverboard by pressing and holding the power button for a few seconds. This will activate the calibration mode.
- Recalibrate the hoverboard: While in calibration mode, keep the hoverboard still and avoid moving it. The hoverboard’s lights may flash or change color during this process. Follow any on-screen instructions or alerts that may appear on your hoverboard’s display, if applicable.
- Turn the hoverboard off and on: Once the calibration process is complete, turn off the hoverboard and then turn it back on again. This will ensure that the calibration settings are saved and applied.
Step 5: Turning the Hoverboard Back On
After calibrating your hoverboard, you’re ready to turn it back on and test if the reset was successful. Press the power button once to turn the hoverboard on.
Pay attention to any indicator lights or beeping sounds that may occur during the startup process. If the hoverboard powers on without any issues, it means that the reset was successful, and your hoverboard should now function properly.

How to Calibrate With A Smartphone App?
Calibrating your hoverboard using a smartphone app can provide a more precise and customized calibration experience. Many hoverboard manufacturers offer dedicated apps that allow you to calibrate your hoverboard with ease. Here’s how you can use a smartphone app to calibrate your hoverboard:
- Download the app: Visit the app store on your smartphone and search for the official app provided by your hoverboard manufacturer. Download and install the app onto your smartphone.
- Connect your hoverboard: Turn on your hoverboard and enable Bluetooth on your smartphone. Open the app and follow the instructions to connect your hoverboard to the app. This step may vary depending on the app and hoverboard model.
- Navigate to the calibration section: Once your hoverboard is connected to the app, navigate to the calibration section. This section is usually located within the app’s main menu or settings.
- Follow the on-screen instructions: The app will guide you through the calibration process step by step. Follow the on-screen instructions carefully to ensure accurate calibration. The app may ask you to perform certain actions, such as tilting the hoverboard or pressing specific buttons.
- Complete the calibration: Once you have followed all the instructions provided by the app, the calibration process should be complete. The app may display a notification or confirmation message to indicate that the calibration was successful.
- Test the hoverboard: After completing the calibration, turn off your hoverboard and then turn it back on again. Test the hoverboard’s functionality by riding it on a flat surface. Check for any improvements in balance, responsiveness, or other issues you were experiencing before the calibration.
It’s important to note that not all hoverboards support smartphone app calibration. If your hoverboard does not have app compatibility, you can still follow the manual calibration process outlined in the earlier steps.
Troubleshooting Common Reset Issues
While resetting your hoverboard will resolve most common issues, there may be situations where further troubleshooting is required. Here are some troubleshooting tips for common reset issues:
- The hoverboard won’t turn back on: If your hoverboard doesn’t power on after the reset, double-check that it is fully charged. Connect it to the charger and let it charge for a sufficient amount of time. If the issue persists, there may be a battery or power-related problem that requires professional assistance.
- Persistent flashing lights or error signals: If your hoverboard’s lights continue to flash or display error signals even after the reset, it could indicate a more significant issue. Check your hoverboard’s user manual or contact the manufacturer’s support for guidance on resolving specific error codes or signals.
- Unresponsive controls or wheel imbalance: If your hoverboard still exhibits unresponsive controls or wheel imbalance after the reset, you may need to recalibrate the hoverboard again. Follow the calibration steps mentioned earlier to ensure proper alignment and balance.
If you have tried troubleshooting the issues mentioned above and your hoverboard still doesn’t function properly, it’s advisable to seek professional help or contact the manufacturer’s support for further assistance.
How to Fix the Hoverboard Not Charging?
If your hoverboard is not charging, here are a few troubleshooting steps you can try:
- Check the power source: Ensure that the charger is properly plugged into a functioning power outlet.
- Inspect the charging port: Make sure the charging port on the hoverboard is clean and free from dirt or debris. Use a soft cloth or compressed air to clean it if necessary.
- Check the charger: Verify that the charger is not damaged or frayed. If possible, try using a different charger to see if the issue is with the charger itself.
- Test the battery: If the above steps do not work, there may be an issue with the hoverboard’s battery. Contact the manufacturer or a professional hoverboard repair service for further assistance.
What is the Meaning of Hoverboard Flash Red Light?
When a hoverboard flashes a red light, it typically indicates a problem with the device. The specific meaning of a red flashing light can vary depending on the hoverboard model and manufacturer. However, here are a few common reasons for a hoverboard to flash a red light:
- Low battery: If your hoverboard’s battery is running low, it may flash a red light to indicate that it needs to be charged. In this case, you should connect the hoverboard to the charger and allow it to charge fully.
- Battery or charging system issue: A red flashing light can also indicate a problem with the battery or the charging system. This could be due to a faulty battery, a damaged charging port, or an issue with the charger itself. If you’ve ruled out a low battery, it’s best to consult the manufacturer’s troubleshooting guide or contact customer support for further assistance.
- Overheating: Some hoverboards have built-in safety mechanisms to prevent overheating. If the internal temperature of the hoverboard exceeds a safe threshold, it may flash a red light to indicate overheating. In this case, you should allow the hoverboard to cool down before using it again.
It’s important to refer to your hoverboard’s user manual or contact the manufacturer for specific instructions on interpreting and resolving red flashing light issues.
Post-Reset Hoverboard Care
After successfully resetting your hoverboard, it’s important to take care of it to prevent future issues. Here are some tips for post-reset hoverboard care:
- Maintain proper battery charge: Follow the manufacturer’s guidelines for charging your hoverboard. Overcharging or undercharging the battery can lead to performance issues and reduce its overall lifespan.
- Ride on flat surfaces: Avoid riding your hoverboard on uneven or rough terrain as it can impact the internal components and balance. Stick to smooth and flat surfaces for optimal performance.
- Perform regular maintenance: Keep your hoverboard clean and free from dirt, debris, and moisture. Regularly inspect the wheels, sensors, and other components for any signs of damage or wear. Clean the hoverboard with a soft cloth and mild cleaning solution, if necessary.
- Use replacement parts when needed: If you encounter any issues or damage that require replacement parts, make sure to use genuine parts recommended by the hoverboard manufacturer. Using incompatible or low-quality parts can further damage your hoverboard.
By following these post-reset care tips, you can prolong the lifespan of your hoverboard and ensure that it continues to operate smoothly.
FAQs
1. How often should you reset your hoverboard?
There is no set frequency for resetting a hoverboard. You should only reset your hoverboard when you encounter specific issues like unresponsive controls, flashing lights, or wheel imbalance. If your hoverboard is functioning properly, there is no need to reset it.
2. Can resetting affect the hoverboard’s battery life?
No, resetting your hoverboard should not affect its battery life. Battery life depends on various factors such as usage, charging habits, and battery quality. Resetting the hoverboard is a troubleshooting step and does not directly impact the battery’s performance.
3. Is it safe to reset a hoverboard yourself?
Yes, it is generally safe to reset a hoverboard yourself. The reset process is straightforward and can be done without any specialized knowledge or equipment. However, always ensure that you follow safety guidelines, turn off the hoverboard before performing a reset, and handle the device with care.
Conclusion
In conclusion, knowing how to reset a hoverboard is essential for troubleshooting common issues and ensuring optimal performance. By following the step-by-step process outlined in this guide, you can easily reset your hoverboard, fix common problems, and calibrate it for a smooth ride. Remember to always prioritize safety and follow the manufacturer’s guidelines for maintenance and care.
Related posts:
 What’s the Weight Limit for Hoverboards? An In-Depth Guide
  Where to Find and Purchase Hoverboards: A Comprehensive Guide
 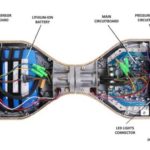 What Does a Hoverboard Look Like: Unveiling the Futuristic Ride
  13 Hoverboard Tricks for Every Rider (Easy & Advanced)
  How Long Does a Segway Battery Last?Complete Guide
  Ultimate Guide to Choosing the Right Hoverboard Size for You