Hoverboards have become a staple of modern transportation and fun, but like any sophisticated gadget, they can encounter issues that disrupt their performance. Calibration problems can lead to balance issues, making your ride less enjoyable or even unsafe. This guide will discuss how to reset and calibrate your hoverboard to restore balance and ensure a smooth ride. Whether you’re facing flashing lights or your hoverboard seems off-kilter, we’ve got you covered with this comprehensive tutorial.
Table of Contents
What Causes Hoverboard Balance Issues?
Hoverboards rely on advanced internal components, such as gyroscopes and sensors, to maintain balance. When these components are not calibrated correctly, the hoverboard may lose stability, resulting in an uneven ride. The most common causes of hoverboard balance issues include:
- Improper calibration: If your hoverboard was not calibrated correctly during the manufacturing process, it may have balance issues right out of the box.
- Wear and tear: Over time, the internal components of a hoverboard can become misaligned or damaged, leading to balance problems.
- User error: Rough handling, exposure to extreme temperatures, or improper storage can also affect the balance of a hoverboard.
Signs You Need to Calibrate Your Hoverboard
It’s important to be able to identify the signs that indicate your hoverboard may need calibration. Look out for the following signs:
- Flashing lights: If you notice flashing lights on your hoverboard, this is often an indication that the calibration needs to be adjusted. Different flashing light patterns can indicate specific issues, such as a low battery or a problem with the motor or control board.
- Uneven ride: If your hoverboard tilts to one side or feels unstable while riding, it’s likely due to a calibration issue. You may feel as though you’re constantly leaning in one direction or struggling to maintain balance.
- Unresponsive controls: Recalibration may be necessary if the hoverboard is not responding as expected to your movements. This can manifest as delayed response time or difficulty in turning or accelerating.
How to Reset Your Hoverboard?
Before you begin the calibration process, it’s important to perform a reset. This ensures that the hoverboard starts from a clean slate and any minor issues are resolved. To reset your hoverboard, follow these steps:
- Turn off your hoverboard: Locate the power button on your hoverboard and press it to turn off the device. This step ensures that the reset process starts from a powered-off state.
- Place the hoverboard on a flat surface: Find a level and stable surface to place your hoverboard on. It’s essential that the surface is flat to ensure accurate calibration.
- Press and hold the power button: Locate the power button on your hoverboard and press and hold it for approximately 10 seconds. This action initiates the reset process.
- Listen for a beep: After holding the power button for 10 seconds, you should hear a beep sound. This indicates that the reset process has been successful.
- Turn on your hoverboard: After performing the reset, turn on your hoverboard and check if the issues you were experiencing have been resolved.
Performing a basic reset can often resolve minor calibration issues and get your hoverboard back in working order. However, if the problems persist, calibration may be necessary.
Hoverboard Calibration Basics
Calibrating your hoverboard involves adjusting the sensitivity and responsiveness of the internal gyroscopes and sensors. The calibration process is relatively simple and can be done in a few easy steps:
- Turn on your hoverboard: Make sure your hoverboard is turned on and ready for calibration. It’s important to have the device powered on to initiate the calibration process.
- Place the hoverboard on a flat surface: Find a level and stable surface to place your hoverboard on. It’s essential that the surface is flat to ensure accurate calibration.
- Press and hold the power button: Locate the power button on your hoverboard and press and hold it for approximately 5 seconds. This action initiates the calibration process.
- Observe the flashing lights: During the calibration process, you will see the lights on your hoverboard flash. This indicates that the calibration is in progress.
- Wait for 30 seconds: After initiating the calibration process, wait for approximately 30 seconds. This allows the hoverboard’s internal components to recalibrate and adjust their settings.
- Turn off and on your hoverboard: After the 30-second recalibration period, turn off your hoverboard and then turn it back on. This ensures that the changes made during calibration are applied.
After completing the calibration process, your hoverboard should be ready for a smooth and balanced ride. It’s important to note that calibration may need to be repeated periodically or whenever you encounter balance issues.
Troubleshooting Common Calibration Problems
If the hoverboard continues to behave incorrectly after a standard calibration, there may be underlying issues that require further troubleshooting. Here are some additional troubleshooting tips to consider:
- Check for loose connections: Inspect the internal wiring and connectors of your hoverboard. Loose connections can affect the calibration process and may cause balance issues. Tighten any loose screws or connectors.
- Inspect the gyroscope: The gyroscope is responsible for measuring the hoverboard’s orientation. If the gyroscope is damaged or malfunctioning, it may need to be replaced. Consult the manufacturer’s guide or seek professional assistance to ensure proper replacement.
- Clean the sensors: Dust and debris can accumulate on the sensors over time, affecting their accuracy. Gently clean the sensors with a soft cloth or brush to remove any dirt or obstructions.
By following these troubleshooting steps, you can address common calibration problems and ensure that your hoverboard is functioning optimally.
When to Consider Professional Repair
If you have tried calibrating your hoverboard and it still doesn’t balance correctly, it’s best to consult a professional. They have the knowledge and expertise to diagnose and fix more complex issues.
DIY Hoverboard Repair Tips
If you’re comfortable with DIY repairs and want to try fixing the hoverboard yourself, here are a few tips to consider:
- Check for loose or damaged wheels: Inspect the wheels of your hoverboard for any signs of damage or looseness. Tighten any loose screws or replace damaged wheels.
- Examine the battery: A faulty or dying battery can affect the performance of your hoverboard, including its ability to maintain balance. Consider replacing the battery if it is old or not holding a charge.
- Inspect the internal components: Carefully open up your hoverboard and inspect the internal components for any signs of damage or misalignment. Common components to check include the control board and wiring connections. If you identify any issues, consult the manufacturer’s guide or seek professional assistance for repairs.
Always exercise caution when performing DIY repairs on your hoverboard, and if you’re unsure about any aspect, it’s best to consult a professional for assistance.
The Role of the Hoverboard App and Remote
Some hoverboards come with additional features, such as smartphone apps and remotes, which can aid in the calibration process and enhance your overall hoverboard experience.
How Smartphone Apps Can Aid in Calibration
Many modern hoverboards come with a companion app that can help you calibrate your board and adjust settings more precisely. These apps allow you to monitor battery levels, track distance traveled, and even control the hoverboard’s speed and sensitivity. To use the app for calibration, follow the manufacturer’s instructions and utilize the calibration feature within the app.
Using a Remote for Calibration
In addition to smartphone apps, some hoverboards include a remote that can initiate the reset and calibration process. Refer to your owner’s manual to see if this feature is available and how to use it. The remote can provide a convenient alternative to using the onboard controls, allowing for more accurate calibration.
How to Know If Your Hoverboard Is Calibrated Correctly?
After performing the calibration process, it’s important to verify if your hoverboard is properly calibrated. Here are a few checks you can perform:
1. Checking for Level Alignment
After calibration, place your hoverboard on a flat surface and observe if it maintains a balanced position. It should be perfectly level with the ground, without any tilting or leaning to one side. If you notice any imbalance, recalibration may be necessary.
2. Testing the Hoverboard’s Response
Take your hoverboard for a test ride on a flat surface to ensure it responds to your movements accurately and maintains balance. Test the acceleration, deceleration, and turning capabilities to ensure everything is functioning as expected. If you experience any issues during the test ride, consider recalibrating your hoverboard.
3. Addressing Flashing Lights and Beeping Sounds
Flashing lights and beeping sounds are common indicators that your hoverboard may require attention. Here’s what you need to know:
4. Decoding Your Hoverboard’s Indicator Lights
Flashing lights on your hoverboard can indicate various issues. Here’s a breakdown of what different patterns may mean:
| Light Pattern | Possible Issue |
|---|---|
| Rapid flashing | Low battery |
| Single flashing | Motor or control board issue |
| Alternating flashing | Gyroscope or sensor problem |
| Solid light | Ready to ride |
Understanding these light patterns can help you diagnose and address potential problems with your hoverboard.
What to Do When You Hear a Beep
A beeping sound from your hoverboard can indicate different things depending on the context. Here are a few scenarios and their possible meanings:
- Single short beep: The hoverboard has successfully entered calibration mode. This is a positive sign that the calibration process has started.
- Continuous beeping: Continuous beeping may indicate an internal error or a specific issue with the hoverboard. Check for loose connections, and damaged components, or consult a professional for further assistance.
Keeping Your Hoverboard Balanced for the Long-Term
To ensure your hoverboard remains in top condition and delivers a smooth ride, it’s important to follow proper maintenance practices. Here are some tips to keep your hoverboard balanced for the long term:
Regular Maintenance Tips
- Avoid extreme temperatures: Avoid exposing your hoverboard to extreme temperatures, as this can affect the internal components and overall performance.
- Clean your hoverboard: Regularly clean your hoverboard to remove dust and debris that can interfere with the sensors and components. Use a soft cloth or brush to wipe down the surface gently.
- Inspect the wheels: Periodically inspect the wheels of your hoverboard for any signs of damage or wear. Replace any damaged wheels to ensure smooth and balanced rides.
- Check the battery: Regularly check the battery level of your hoverboard and charge it according to the manufacturer’s instructions. Overcharging or undercharging can affect the battery’s performance and, in turn, the hoverboard’s balance.
- Proper storage: When not in use, store your hoverboard in a cool, dry place. Avoid leaving it exposed to moisture or direct sunlight, as this can damage the internal components.
By following these maintenance tips, you can help prolong the lifespan of your hoverboard and ensure optimal performance.
The Importance of Properly Charging Your Hoverboard
Proper charging is crucial for maintaining the performance and lifespan of your hoverboard. Here are a few key points to consider:
- Use the charger provided: Always use the charger provided by the manufacturer. Using an incorrect charger can damage the battery and affect the hoverboard’s balance.
- Avoid overnight charging: Once the battery is fully charged, unplug it to prevent overcharging, which can lead to battery degradation and affect the overall balance of the hoverboard.
- Charge on a flat, stable surface: When charging your hoverboard, place it on a flat and stable surface to prevent any accidents or damage. This ensures that the hoverboard remains in a balanced position during charging.
Hoverboard Calibration for Bluetooth Models
If you own a Bluetooth-enabled hoverboard, there are a few additional considerations when it comes to calibration:
- Disconnect any paired devices: Before attempting calibration, make sure to disconnect any paired smartphones, tablets, or other devices from the hoverboard. Bluetooth interference from these devices can affect the calibration process and lead to inaccurate results.
- Check the Bluetooth chip: If your Bluetooth hoverboard is experiencing calibration issues, it’s possible that the Bluetooth chip itself is damaged or malfunctioning. In such cases, you may need to consult a professional or contact the manufacturer for further assistance.
It’s important to note that Bluetooth connectivity and calibration are separate functions. While Bluetooth can enhance the overall experience of using a hoverboard by allowing for additional features and control options, it does not directly impact the calibration process. Calibration primarily focuses on adjusting the internal components of the hoverboard to ensure proper balance and performance.
Conclusion
Calibrating your hoverboard is a crucial step in ensuring its longevity and performance. By following the steps outlined in this guide, you can quickly and effectively restore balance and functionality to your self-balancing scooter. So go ahead, reset and calibrate your hoverboard to restore balance, and get ready for an exciting ride!
Related posts:
 How to Ride a Hoverboard: A Comprehensive Guide for Beginners
  What’s the Weight Limit for Hoverboards? An In-Depth Guide
  Where to Find and Purchase Hoverboards: A Comprehensive Guide
 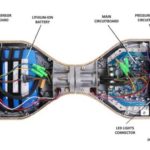 What Does a Hoverboard Look Like: Unveiling the Futuristic Ride
  13 Hoverboard Tricks for Every Rider (Easy & Advanced)
  How Long Does a Segway Battery Last?Complete Guide