Hoverboards have exploded in popularity over the last few years. While they don’t hover, these popular gadgets live up to their hoverboard nickname by seamlessly gliding you along. Hoverboards provide a fun and futuristic way to get around your neighborhood, campus, or anywhere you need to go. But like any modern gadget, hoverboards need to be charged properly to keep them performing well. This article discusses everything you need to know about safely charging your hoverboard the right way.
Table of Contents
How to Charge a Hoverboard Safely?
Charging your hoverboard improperly or with the wrong equipment can pose serious risks from fire hazards to battery damage. Follow these essential tips for safely charging your hoverboard:
1. Use Only the OEM Charger
Never use a charger that doesn’t come with your hoverboard model. Even if the connectors fit, the voltage and amperage can still vary and cause major issues.
Only use the original charger that came with your hoverboard. It’s designed specifically for your make and model’s battery setup. Mixing in generic or improper chargers can literally cause your hoverboard to explode or catch fire. Not worth the risk!
2. Charge in a Safe Area
Find an indoor area like a garage or room where you’ll be around while your hoverboard charges in case any issues arise. Don’t leave it charging unattended. And definitely don’t charge outdoors where it could get wet.
Make sure to charge on a hard, non-flammable surface rather than carpet or furniture. And avoid charging near any flammable materials like blankets or paper just to be extra safe.
3. Use a Proper Power Source
Plug the charger directly into a wall outlet rather than a power strip, extension cord, or other accessory. This ensures consistent uninterrupted power.
Avoid loose, damaged, or faulty outlets that could disrupt charging. And never overload outlets with too many devices.
4. Pay Attention to Indicator Lights
Your hoverboard and charger will display red and green indicator lights that signal when charging begins, is underway, and is completed.
Watch these closely to avoid overcharging and know when batteries are replenished. We’ll go over what the lights mean coming up.
5. Disconnect When Finished
Once the lights confirm charging is complete, disconnect your hoverboard within an hour or two. Avoid leaving it plugged in overnight after it’s fully charged. This prevents overcharging risks.
6. Charge in Proper Temperatures
Don’t charge your hoverboard in very cold temperatures below 40°F or very hot temps over 95°F. Extreme cold or heat can disrupt proper charging and be dangerous. Stick to standard indoor temperatures.
7. Care for Your Battery
Gently handle your hoverboard battery housing when transporting and charging to avoid physical damage. Drops, bumps, or moisture can harm the battery cells or electronics.
Following the manufacturer’s guidelines is key to staying safe and maximizing your hoverboard’s battery lifespan. Now let’s look at how to monitor charging progress.
How Long Does It Take to Charge a Hoverboard?
The time it takes to fully charge your hoverboard will depend on a few key factors:
1. Battery Size
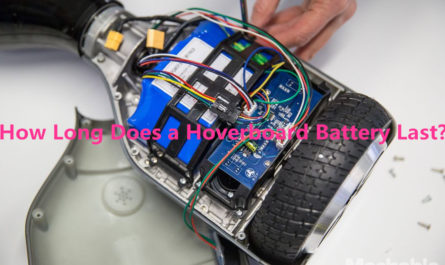
Hoverboards contain lithium-ion battery packs rated from around 4.4Ah on the low end up to 10Ah or more for higher-end models. Generally, the bigger the battery, the longer it will need to fully charge.
Standard-size batteries take 2 to 3 hours for a full charge. Bigger batteries may need 4 hours or more to reach 100%. Compare your hoverboard’s battery size to its recommended charge time.
2. Charger Power
Faster 2A or 2.5A chargers will charge your hoverboard much quicker than slower 1A chargers. Match up the output rating on your charger model to determine the approximate charge time. Higher amperage equals faster charging.
3. Charge Level
Charging from an empty battery will take the full 2 to 4 hours to replenish. If you’re hoverboard still has 50% battery, it may only take half that time to top it back up. The lower the starting charge, the longer it takes.
To summarize, you can expect a full charge to take between 2 and 4 hours depending on your model’s battery size and charger speed. Charging from empty will always take the longest.
Be sure to use the original charger that came with your hoverboard for proper charge times. Never substitute a different charger model.
Now let’s go over some key steps for safely charging your hoverboard without issues.
How to Tell if the Hoverboard is Charging or Not?
Your hoverboard and charging brick will display indicator lights that show the status of the charging process:
Hoverboard Indicator Lights
- The hoverboard power light will turn red when charging begins.
- It will change to solid green once fully charged.
- Flashing green means nearly full charge.
- No light or a red blinking light indicates an issue.
Charger Indicator Lights
- The charger light will turn green once charging starts.
- It will change to red or orange when fully charged.
- No light means you have a faulty connection or power source.
Watch these lights closely to monitor charging progress and know when batteries are replenished. They are your guide to proper charging.
If lights don’t come on at all, there may be an issue with the electrical outlet, charger itself, charging cable, or hoverboard battery. Inspect all connections and power sources closely in this case.
How Do You Know the Hoverboard is Fully Charged?
Here are the signs to look for so you know your hoverboard is fully juiced up and ready to roll out:
- The hoverboard LED light stops blinking and turns solid green. This is the key indicator to look for.
- The charger light changes from green to solid red or orange. Don’t rely on the charger light alone though.
- The battery indicator on your hoverboard dashboard reads “Full” or 100%. Some models show exact percentages.
- The hoverboard stops making the high-pitched charging sound once the batteries reach full.
- You’ve unplugged it and reconnected it and the lights still show full charge. This double-checks it.
Once you see these indicators, you can safely disconnect your hoverboard and go have fun zipping around! Just be mindful not to overcharge it past this point.
Now let’s go over some alternative charging options if your hoverboard charger gets lost or damaged.
How Can I Charge My Hoverboard Without the Original Charger?
It’s strongly recommended to always use the original OEM charger that came with your particular hoverboard model. Never use a different charger even if it fits.
Substituting a generic aftermarket charger or one for a different hoverboard model can cause major safety issues from overheating to catastrophic battery failure. At a minimum, it will reduce battery life. However, if your OEM charger gets lost, broken, or damaged, here are some options:
1. Buy a Replacement from Manufacturer
Contact the maker of your hoverboard to buy a replacement OEM charger designed specifically for your model. This is the safest option.
2. Borrow a Friend’s Charger
If you know someone with the exact same model hoverboard, you may be able to safely borrow their charger for a while. But confirm it’s the same make and model.
3. Charge at a Friend’s House
Bring your hoverboard to a friend’s house who has the same model charger to charge up. This prevents you from having to buy a replacement right away.
How to Charge a Hoverboard without a Charger in an Emergency?
Again, it’s strongly advised to always use the original OEM hoverboard charger for optimal safety and performance. But in a bind, some potential makeshift charging options include:
1. Using a Car Charger Adapter
- An emergency car charging adapter that plugs into your car’s 12V outlet can slowly charge your hoverboard battery while driving.
- The car must be running the whole time to provide consistent power and avoid draining the car battery.
- Make absolutely sure the car adapter matches the voltage (12V), amperage (2A+), and charging port type of your hoverboard to prevent damage.
- You’ll need to drive for at least an hour or more to provide enough charge to safely ride your hoverboard any meaningful distance.
- Car charging is slow but can get you minimal charge in a pinch if no other power sources are available.
2. Connecting Battery Wires to Alternative Power Source
- As a last-ditch resort, you could in theory connect the hoverboard’s battery wires directly to another DC power source.
- This could mean wiring to large external batteries, generators, or custom charging rigs IF you intimately understand electrical safety.
- Directly wiring batteries incorrectly can literally cause explosions, electrocution, fires, or complete destruction of electronics. Only attempt with extreme caution and electrical expertise.
- Soldering, voltage regulation, fuses, insulation, etc need to be perfect or risk catastrophe. Never connect directly to wall AC power.
3. Solar Charging
- With enough solar panels and proper electrical adapters, you may be able to slowly charge a hoverboard via sunlight as emergency power.
- But charging will be very slow due to low amperage. Several panels would be needed to meaningfully charge in a reasonable timeframe.
- Only pursue solar charging with proper electrical guidance since directly connecting to panels carries risks.
- In an emergency with no other power source, solar can provide supplemental trickle charging. Just don’t expect quick results.
4. Kinetic Charging
- In theory, you could charge a hoverboard by connecting an alternator or dynamo driven by pedaling or cranking to generate emergency power.
- This allows charging the batteries by converting physical kinetic work into electrical energy.
- Highly complex and inefficient, but pedal or crank power could trickle charge depleted batteries when absolutely no other options exist. Don’t expect much range.
5. Universal Power Adapter
A universal power adapter may work but only if it matches the exact voltage, amperage, and connector. This is risky.
While inconvenient, going with a manufacturer replacement charger is your best bet to avoid safety hazards and charging problems. Okay, so now what if you need a quick charge in a pinch without the proper OEM charger?
While the above methods could work as an absolute last resort, they come with major risks if not done 100% correctly. Your best bet is always to have a working OEM hoverboard charger readily available. But if stranded, be creative!
Tips for Boosting Your Hoverboard Battery Life
To get the most life from your hoverboard’s lithium-ion batteries and keep it performing great:
- Charge properly – Never overcharge or leave charging more than a few hours after full.
- Store at 50% charge – Keep batteries around half full during long periods of non-use so they don’t fully drain.
- Avoid temperature extremes – Only charge where ambient temps are between 40° and 95°F ideally.
- Prevent physical damage – Don’t drop, dent, or get batteries wet to protect cells.
- Limit heavy usage – Going up steep hills or harsh riding can drain batteries quickly.
- Consider rider weight – Heavier riders will get less mileage per charge than lighter ones.
- Clean electrical contacts – Keep the contacts between the battery and the hoverboard clean.
Should You Leave a Hoverboard Charging Overnight?
It’s generally not recommended to leave your hoverboard plugged into the charger all night after the batteries are fully charged. Here’s why:
- Overheating – Continued charging can cause batteries to overheat, swell, or even catch fire in some cases.
- Battery degradation – Trickle charging after fully wearing out lithium-ion batteries quicker over time.
- Tripping hazard – Leaving it charging in walkways or while sleeping risks loose cords that can trip someone.
- Electrical hazards – Risk of electric shock or sparks if wires get damaged or wet.
Once your hoverboard is fully juiced up after 2 to 4 hours max, play it safe by unplugging it within the next hour or two rather than leaving it charging unattended overnight.
The nominal extra battery life isn’t worth the risks. Just top it off right before you need to use it. Okay, so what if you have an issue with the charger itself?
What If My Hoverboard Charger Stops Working Properly?
If your OEM hoverboard charger stops working, stops charging, doesn’t light up, etc., stop using it immediately. An improperly working charger can damage your batteries or cause electrical hazards.
Start by inspecting connections and trying different outlets to confirm the issue isn’t with the power source. If the charger itself seems faulty, you’ll want to replace it.
Contact the manufacturer of your hoverboard to purchase the exact replacement charger made specifically for your model. Generic aftermarket chargers won’t work safely.
If under warranty, the faulty OEM charger may be covered. If not, expect to pay $30 to $60 for an official replacement from the maker.
Avoid opening up and trying to repair chargers yourself unless you really know what you’re doing. Replacements keep things safe.
Should I Turn My Hoverboard Off While Charging?
Most modern hoverboards allow charging while turned on or off. However, some brands still recommend charging only when powered down for maximum safety.
Check your owner’s manual for any guidelines. If not mentioned, here are some pros for each method:
Charging While OFF
- Eliminates the risk of riding off while still plugged into the charger.
- Prevents pushing the battery level too low by playing speakers or lights.
- Some report it charges slightly faster when off. But minimal difference.
Charging While ON
- LEDs act as charge indicators right on the unit.
- Allows you to monitor charging progress as levels increase.
- More convenient since you don’t have to turn it back on later.
For optimal safety, turning it off first is generally the best way to charge your hoverboard if possible. Just be sure to power it back on after disconnecting to check the levels.
Okay, last up, what if your hoverboard won’t charge at all? Let’s go over some troubleshooting tips.
Hoverboard Won’t Charge: What’s the Problem?
If your hoverboard suddenly refuses to charge, here are some things to check:
- Try a different electrical outlet in case the problem is with the power source.
- Inspect the charger carefully for any damage and test with different charging cables if possible.
- Make sure the hoverboard battery is installed properly without any loose connections or damage.
- The battery may have worn out if your hoverboard is older. The average lifespan is 2 to 3 years.
- You may need to replace the OEM charger if it’s damaged or no longer functioning. Only use a manufacturer replacement.
- Charging issues could signify a problem with the hoverboard’s charging port or internal electronics.
If you still can’t get your hoverboard to charge after checking all of the above, you’ll likely need to have it looked at by the manufacturer. Contact them to troubleshoot further and repair any internal issues.
Key Takeaways on How to Charge a Hoverboard
To wrap up, here are the critical points to remember for safely charging your hoverboard the right way:
- Know your charge time based on battery size and charger specs. Full charges take 2 to 4 hours.
- Only use the original OEM charger – others can be unsafe. Never leave charging unattended.
- Watch indicator lights on the unit and charger to monitor progress. Solid green means fully charged.
- Disconnect within a few hours once fully charged to avoid overcharging risks.
- Store hoverboards at around 50% charge when not used for extended periods.
- Replace faulty chargers through the manufacturer. Don’t jury rig alternatives.
- Carefully follow usage and charging guidelines for maximum battery lifespan.
Charging properly helps your hoverboard run safely while also extending its battery life. Just be cautious and patient with charging and you’ll get reliable operation for years to come!
Related posts:
 How Much Do Hoverboards Cost? 2024 Prices and Guide
  How Long Does a Hoverboard Battery Last? Maximizing Your Ride
  How Much Does Hoverboards Weigh? A Complete Guide
  Are Hoverboards Allowed on Airplanes?Know the Policies
  Segway vs Hoverboard: Unveiling the Key Differences
  Can You Ride a Hoverboard in the Rain?Tips for Safe Riding