Riding a hoverboard provides hours of fun and entertainment. But over time, the rechargeable battery inside a hoverboard will begin to lose capacity and need replacing. Replacing a faulty or old hoverboard battery is essential to restore power and range.
Luckily, with the right preparations and by following key steps, hoverboard owners can safely replace their hoverboard’s battery on their own. This comprehensive guide will walk through the entire process, from understanding when a battery needs replacing to the step-by-step instructions for installation.
Table of Contents
Signs It’s Time to Replace Your Hoverboard Battery
Hoverboard batteries are typically designed to maintain good performance for 1-2 years under normal usage. Over time, the lithium-ion cells start to wear down through repeated charge cycles, a process called capacity fading. The battery will need replaced once capacity fades past a certain level.
Watch for these telltale signs that indicate it could be time to replace your hoverboard’s battery:
1. Decreased Range Between Charges
If your fully charged hoverboard can’t travel as far as it used to or runs out of juice more quickly, the battery is losing capacity. Most hoverboard batteries allow anywhere from 5 to 15 miles per charge when new. Once range drops 50% or more, it’s a sign of a worn battery.
2. Longer Charge Times
It takes longer to fully recharge a battery as it ages. If charging your hoverboard seems to take double the normal time or never fully completes, the battery needs replacing.
3. Failure to Hold a Charge
You fully charge the battery overnight, unplug it in the morning, and the battery dies in under an hour. If the battery discharges very rapidly and won’t hold a charge, its ability to store energy has been depleted.
4. Frequent Overheating
Excessive heat is damaging to batteries. If you notice your hoverboard battery feels hot to the touch frequently even when not charging, or you get warnings about overheating, the battery may be wearing out.
5. Swollen Battery Casing
If the plastic casing around the battery pack appears swollen or warped, that signals the lithium-ion cells have become unstable. This condition requires immediate battery replacement as it poses a fire risk. Never charge or use a hoverboard with a swollen battery.
6. Error Codes Related to the Battery
Many hoverboards have battery indicator lights that will flash certain error codes if the onboard diagnostics detect a battery issue. Consult your owner’s manual to interpret the meaning of any error codes. Commonly they indicate low battery, not charging properly, or temperature exceeding safe levels. Any battery-related error merits investigation into replacement.
How to Select the Right Replacement Hoverboard Battery?
The key to a smooth battery replacement process is sourcing the proper replacement battery for your hoverboard’s make and model. Batteries vary in voltage, capacity, size, connectors, and compatibility. Choosing the wrong battery can prevent your hoverboard from functioning properly after installing it.
Follow these tips to select the optimal replacement hoverboard battery:
1. Match the Voltage
Hoverboard batteries typically range from 22V to 36V. The voltage must precisely match the original battery or the hoverboard electronics could be damaged. Refer to your owner’s manual or the markings on the current battery to determine required voltage.
2. Match or Exceed the Battery Capacity
The battery capacity is measured in milliamp-hours (mAh). A higher mAh rating means more range. It’s okay to upgrade to a battery with a higher capacity than the original, but never go lower. Check existing battery capacity before purchasing.
3. Check Physical Dimensions
Make sure the replacement’s physical size allows it to fit properly into the battery compartment. Compare dimensions to the existing battery.
4. Ensure Connector Compatibility
Hoverboard batteries use special connectors to interface with the mainboard. These can vary between brands and models. Review connector style and location to ensure a match.
5. Buy From Reputable Retailers
Only buy replacement batteries from reputable retailers known for quality products. Read reviews and battery specs carefully before purchasing. Avoid cheap knockoff batteries that could damage your hoverboard or be unsafe.
Tools Required
Before you start replacing the battery in your hoverboard, you will need to gather some tools. Having the right tools will make the process smoother and more efficient. Here are the tools you will need:
1. Screwdriver
You will need a screwdriver to remove the screws that hold the cover of your hoverboard in place. A Phillips #1 screwdriver is the most common type of screwdriver needed for this job. Make sure you have the right size screwdriver to avoid damaging the screws.
2. Clamps
Clamps can be useful to hold the hoverboard in place while you are working on it. This will prevent it from moving around and making it easier to work on.
3. Machine Screws
Machine screws are used to attach the battery to the hoverboard. Make sure you have the right size screws for your specific hoverboard.
4. Sheet Metal Screws
Sheet metal screws are used to attach the cover back onto the hoverboard. Make sure you have the right size screws for your specific hoverboard.
5. Electric Screwdriver
An electric screwdriver can be useful to speed up the process of removing and replacing screws. However, it is not necessary and a manual screwdriver will work just fine.
By having these tools ready, you will be able to replace the battery in your hoverboard with ease.
How to Replace Your Hoverboard Battery: A Step-by-Step Guide
Before you start replacing your hoverboard battery, there are a few things you should do to prepare.
First, make sure your hoverboard is unplugged and turned off. This will ensure your safety while working on the device.
Second, charge your replacement battery fully before installing it. This will ensure that your hoverboard will work optimally once the new battery is installed.
Third, research which replacement battery model will fit your hoverboard. You can do this by consulting a professional or researching online. It is important to get the right model as incorrect ones can cause damage to your board and void your warranty.
Fourth, gather the necessary tools. You will need a screwdriver to unscrew the bottom panels of your hoverboard until you can access all of its internal parts.
Fifth, be sure to work in a clean and clear area to prevent losing any screws or damaging any components.
By following these steps, you will be well prepared to replace your hoverboard battery safely and effectively.
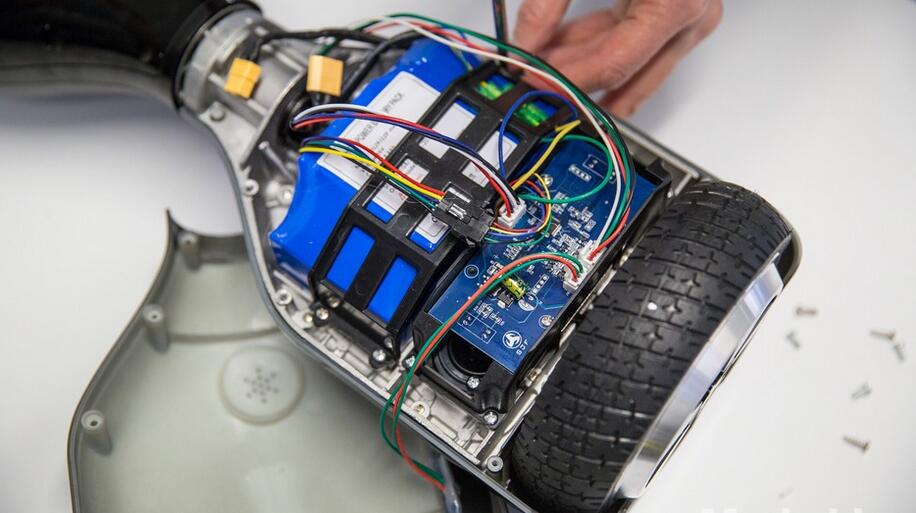
1. Removing the Outer Cover
If you want to replace the battery of your hoverboard, you first need to remove the outer cover. The cover protects the internal components of the hoverboard, including the battery. Removing the cover is a straightforward process, but you need to be careful not to damage it.
Before you start, make sure your hoverboard is turned off and unplugged. Then, follow these steps to remove the outer cover:
- Locate the screws that hold the cover in place. Depending on the model of your hoverboard, there may be between 6 and 10 screws. You can find them on the bottom or top of the hoverboard.
- Use a screwdriver to remove the screws. Make sure you keep the screws in a safe place so you don’t lose them.
- Once you’ve removed all the screws, gently lift the cover off the hoverboard. Be careful not to force it or pull too hard, as you could damage the cover or the components inside.
- If the cover doesn’t come off easily, check to see if there are any clips or latches holding it in place. You may need to use a flat tool, like a plastic spudger, to gently pry the cover off.
- Once you’ve removed the cover, set it aside in a safe place. You’ll need to put it back on later, so make sure you don’t lose it or damage it.
Removing the outer cover is the first step in replacing the battery of your hoverboard. Once you’ve done this, you can access the battery and remove it from the hoverboard.
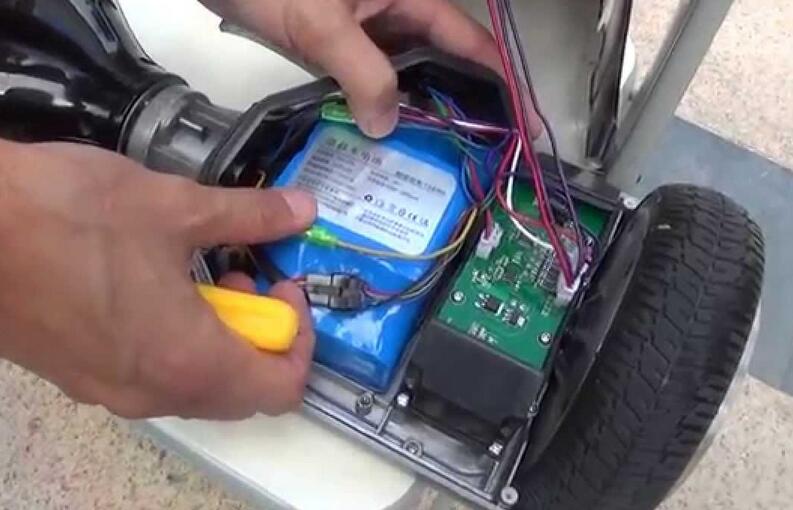
2. Unplugging the Battery
Before you start replacing the battery, you need to unplug it from your hoverboard. To do this, follow the steps below:
- Turn off your hoverboard and disconnect the charger. Make sure your hoverboard is turned off and disconnected from the charger before you start unplugging the battery.
- Locate the battery compartment. The battery is usually located underneath the hoverboard. You may need to remove the cover to access the battery compartment.
- Identify the cables that connect the battery to the hoverboard. There are usually two cables that connect the battery to the hoverboard. One cable is red and the other is black.
- Unplug the cables from the battery. Use your fingers to gently pull the cables out of the battery. If the cables are difficult to remove, you may need to use a pair of pliers to help you.
- Double-check that the cables are completely unplugged from the battery. Make sure that there is no tension on the cables and that they are completely disconnected from the battery.
It’s important to unplug the battery before you start replacing it to prevent any electrical shocks or accidents. By following these steps, you can safely unplug the battery from your hoverboard.
3. Installing the New Battery
Now that you have removed the old battery, it’s time to install the new one. Make sure you have the right replacement battery for your hoverboard. If you’re not sure, check the manufacturer’s website or manual.
- Place the new battery in the battery compartment with the battery side facing up.
- Connect the charging pins to the new battery. Make sure they are securely connected.
- Place the battery cover back on and screw it in place. Make sure it’s tight.
- Turn your hoverboard over and power it on.
That’s it! Your hoverboard should now be working with the new battery. Remember to charge the new battery fully before using your hoverboard.
4. Reassembling the Hoverboard
Now that you have successfully replaced the battery of your hoverboard, it’s time to reassemble it.
First, carefully place the motherboard back into the shell. Make sure that all the wires and connections are properly aligned.
Next, replace the screws that you removed earlier. Tighten them carefully but not too tightly as it may damage the shell.
Once you have replaced all the screws, double-check that everything is properly secured.
Finally, turn the hoverboard over and give it a test run. Make sure that the battery is working properly and that all the components are functioning as they should.
If everything looks good, congratulations! You have successfully replaced the battery of your hoverboard and reassembled it.
Remember, if you ever need to replace the battery again, you can always refer back to this guide.
Maintenance and Longevity
Taking care of your hoverboard battery is essential to ensure its longevity. Proper maintenance can help extend the lifespan of your battery and save you money in the long run. Here are some tips to help you maintain your hoverboard battery:
- Charge your battery properly: Overcharging or undercharging your battery can cause damage to the cells, which can shorten its lifespan. It’s important to follow the manufacturer’s instructions on how to charge your battery properly. Avoid charging your battery overnight or leaving it plugged in for an extended period.
- Keep your battery clean: Dirt and dust can accumulate on your battery and cause it to overheat. Use a soft cloth to wipe down your battery regularly and keep it free from debris.
- Avoid extreme temperatures: High temperatures can cause your battery to overheat, while low temperatures can cause it to lose power. It’s best to store your hoverboard in a cool, dry place and avoid exposing it to extreme temperatures.
- Inspect your battery regularly: Check your battery for any signs of damage or wear and tear. If you notice any cracks, leaks, or other damage, it’s best to replace your battery as soon as possible.
By following these maintenance tips, you can help extend the lifespan of your hoverboard battery and avoid costly repairs or replacements. Remember to always follow the manufacturer’s instructions and use high-quality replacement parts when necessary.
When to Seek Professional Assistance
If you’re not comfortable with replacing the hoverboard battery on your own, it’s best to seek professional assistance. A professional can ensure that the replacement is done correctly and safely, and can also diagnose any other issues that may be affecting your hoverboard’s performance.
When looking for a professional to assist with the replacement, make sure to choose a reputable and experienced provider. You can ask for recommendations from friends or family who own hoverboards, or search online for local repair shops that specialize in hoverboard repairs.
One option is to contact the manufacturer of your hoverboard, such as Hover-1, and inquire about their repair services. They may be able to provide you with a list of authorized repair centers in your area.
When you bring your hoverboard in for professional assistance, be sure to communicate any issues or concerns you’ve been experiencing with your hoverboard. This can help the technician diagnose any underlying issues that may be affecting your hoverboard’s performance, such as a faulty motor.
Related posts:
 8 Reasons Why Your Hoverboard Could Be Beeping
  How to Fix a Hoverboard That Won’t Turn Off:Complete Guide
  How to Charge a Hoverboard Without a Charger(6 Best Method)
  Hoverboard Won’t Charge? Troubleshooting and Repair Guide
  Hoverboard Got Wet? Tips and Steps to Repair Your Hoverboard
  Why Is My Hoverboard Beeping? In-Depth Troubleshooting Guide